Until now you learned how you can import your own models, use textures and do some lighting. In order to make your scenes more realistic it's time to add some shadows, don't you think?
To be able to use shadows, you first need a light source. What kind of light source does not matter – shadows can be used with directional lights and spot lights as well as point lights. Shadow rendering is turned on, when the shadowIntensity property of a light node is set to a value greater than zero. The higher the setting, the darker the shadows will be. However, be advised that shadow computations are quite expensive and can have noticable impact on the performance of your application. To learn how to turn on lights please visit the previous tutorial.
Remember to set the shadowIntensity to a value higher than zero to turn on the shadows.
One of the most important settings – both regarding the visual quality of the shadows and the performance – is the shadowMapSize setting. A shadow map is a texture which captures the scene from a light’s point of view and is the basis for all shadow computations in X3DOM. The size of the shadow map determines the resolution at which shadows are computed. The standard setting of 1024 should achieve good results in most cases, but depending on the situation you might want to change it anyway. In general, a higher shadow map resolution leads to more detailed shadows, but also to a significant drop in performance.
Another option which has significant impact on the quality of the shadows is shadow map filtering. Filtering makes the edges of the shadows seem smoother. It can be controlled with the shadowFilterSize attribute. A higher filter size increases the amount of blurring that is applied to a shadow map. However, the effectivenes of this technique does not only depend on the filter size, but also on the resolution of the shadow map. A high-resolution shadow map requires a higher filter size setting for filtering to be effective.
Another technique to improve shadow quality which is especially helpful in big scenes is called cascading: the visible area is parted along the z-axis and for each of the created divisions (cascades) shadows are computed independently. The number of cascades to be used can be set with the shadowCascades option. Cascading can be used with directional lights and spot lights, but not with point lights. Be advised that this technique is only effective, if the light covers a relatively big area. Consequently, the main application scenario lies in the usage with a directional light.
You can try these options in this simple demo scene.
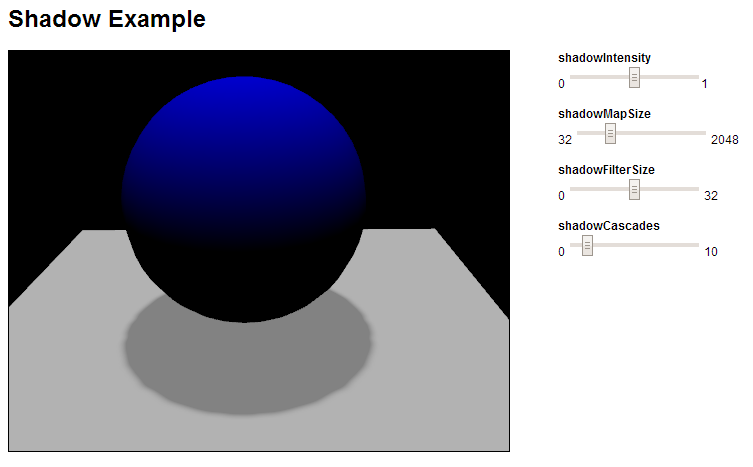
With the right combination of shadowMapSize, shadowFilterSize and shadowCascades a satisfyable shadow quality should be achievable in most cases. However, there are situations in which further adjustments might be needed, which is why an additional set of shadow options was introduced into X3DOM.
The first one – shadowOffset – is used to hide artifacts which may occur in specific scenarios. One of these situations that is escpecially susceptible to inaccuracies is a scene in which the light direction is nearly parallel to an object’s surface.
By increasing the shadowOffset the shadow artifacts become less pronounced. However, not only artifacts are affected by this setting, but to some degree the correctly drawn shadows are, too.
A high shadow offset can result in light to leak onto objects which should be in shadow. For this reason the default offset value is zero.
Further options to influence shadow computations are given by the light node’s zNear and zFar properties. These settings determine the placement of the near and far planes of the light projection, i.e. the bounds of the
area in which shadow casters are captured. If no such setting is given, the near and far planes are placed automatically.
An example scenario where a manual setting of one of these planes might be helpful would be a scene where an object is placed very closely to the light source. If you don’t want that object to cast a shadow, the zNear setting can be set to a value which places the near plane behind that object and thereby excludes it from the shadow computations. (Please note: if the shadows disappear when a shadow caster leaves the visible view area, then try setting the Environment bindable node’s frustumCulling field to false.) The last two settings – shadowSplitFactor and shadowSplitOffset – are additional parameters for cascading. As mentioned before, when using shadow cascades the visible area is split along the z-axis. The shadowSplitFactor setting determines, how these splits are placed. A setting of zero gives an equidistant placement, a setting of one a logarithmic placement. In most cases a logarithmic placement should achieve better results, since it allocates more resolution to the close range where it is needed the most. However, the equidistant split scheme can still be useful in some scenarios, as the transitions between different cascades are less apparent. The shadowSplitOffset option was introduced, because in some cases the cascades close to the near plane can get quite small. While this is good for shadow quality in that specific cascade, the transition to the next cascade will become all the more apparent. By using the shadowSplitOffset property, the split positions are moved away from the camera while the computation scheme that is defined by shadowSplitFactor is still respected.
Finally, shadows are affected by gamma correction, as shadowIntensity is considered a linear intensity whose effect is dependent on whether you compensate for gamma. When working gamma-corrected / linear, the setting controls the amount by which a pixel in the umbra is darkened, e.g. 0.7 means 70 % darkness, so 30% of the pixel’s intensity remains. Accordingly, 0.82 or 82% results in an umbra which is visually half as bright as the environment. See the gamma and lighting tutorial for more information.
 Display example HTML file
 Download full example (.zip archive)