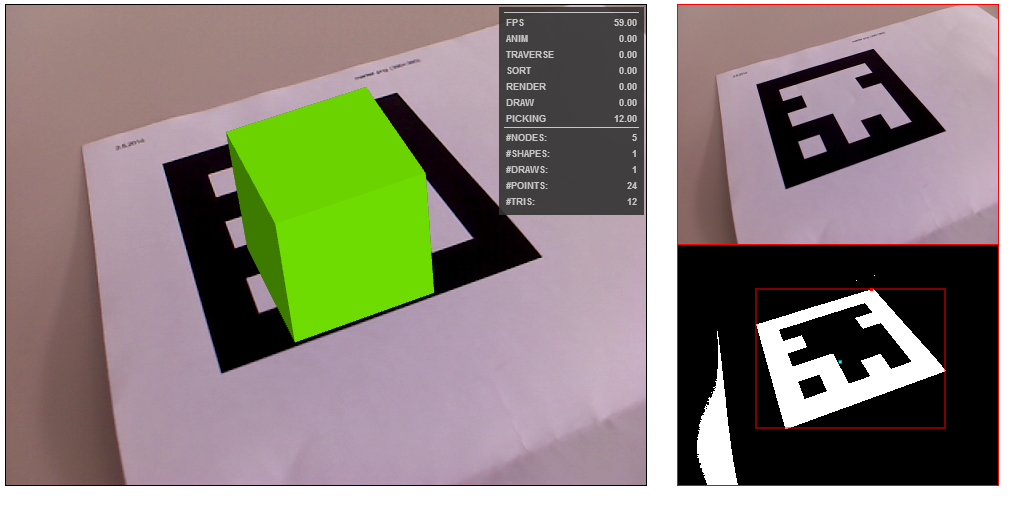
Augmented reality (AR) is the integration of digital information with live video or the user's environment in real time. In this tutorial you will learn how build a simple AR Application with X3DOM. The goal is to render a 3D-Model on top of a marker filmed by a web-cam. In order to keep it simple we will use the JSARToolKit and to access the webCam we use the navigator.getUserMedia() method. It is only available in HTML 5, so if you are not sure if your browser is supporting it properly you can test here.
There are really good tutorials available about getting access to the webcam with the getUserMedia() method and one really good tutorial about the initialisation of the JSARToolKit, which is why we will only provide a theoretical overview about the techniques and a detailed manual for showing your augmenting in x3dom. The example at the bottom of the page is a fully commented one, so if you stuck completely that might be helpful.
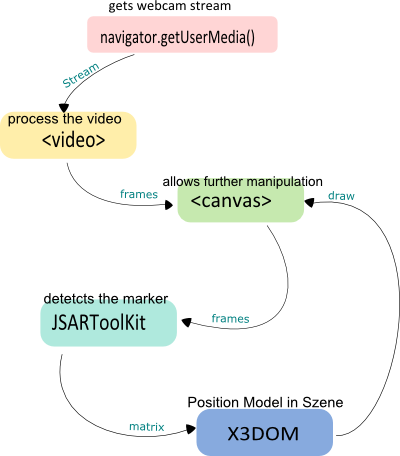
The navigator.getUserMedia() passes you a video stream which can be displayed with an html5 <video> tag, but the JSARToolKit needs single frames to detect markers. So you first draw your video frame by frame on the canvas and tell the ToolKit canvas.changed = true. The ToolKit takes every frame and searches by using rasterization to find the marker and calculates the marker position. The resulting matrix is what we need to draw our 3D Model to the right position on the canvas.
Add a 3DOM tag to your index.html, create a scene and add an empty <viewfrustum> with an id. Then add a <matrixtransform id="root"> node and inside the model you want to display.
The MatrixTransform node is where you will use the matrix you get from the toolkit after modifying it a bit.
That should look similar to this:
<X3D id="x3d" width="640px" height="480px">
            <Scene>
                <Viewfrustum id="vf"></Viewfrustum>
                <MatrixTransform id="root">
                    <Transform rotation="0 1 0 3.14159265359">
                            <transform translation="0 0 0.2">
                                <shape>
                                    <appearance>
                                        <material diffuseColor="0.5 1 0"></material>
                                    </appearance>
                                    <box size="60 60 60"></box>
                                </shape>
                            </transform>
                    </Transform>
                </MatrixTransform>
            </Scene>
        </X3D>
You need to make some minor changes in your JSARToolKit initialization in order to get the viewport right. It is quite easy, you just take the clipping planes which are specified in the X3DOM viewfrustum and the current perspective matrix. The X3DOM runtime API provides proxy object to programmatically read and modify runtime parameters. The runtime proxy is attached to each X3D element and can be used as shown below to get the perspective matrix.
 var camera = document.getElementById("vf");

    var zNear = camera.getNear();
    var zFar = camera.getFar();
    var perspectiveMatrix = runtime.projectionMatrix().toGL();

    param.copyCameraMatrix(perspectiveMatrix, zNear, zFar);

    var proj = new x3dom.fields.SFMatrix4f();
    proj.setFromArray(perspectiveMatrix);
    proj._22 *= -1;
    proj._32 *= -1;

    camera.setAttribute("projection", proj.toGL().toString());
You need to flip the matrix, cause the camera image is flipped.
function adaptMarkerMatrix(arMat)
{
    var tmpMat = new x3dom.fields.SFMatrix4f(
        arMat.m00,  arMat.m01,  arMat.m02,  arMat.m03,
        arMat.m10,  arMat.m11,  arMat.m12,  arMat.m13,
        arMat.m20,  arMat.m21,  arMat.m22,  arMat.m23,
        0,          0,          0,          1);

    var translation = new x3dom.fields.SFVec3f(0,0,0),
        scale = new x3dom.fields.SFVec3f(1,1,1);
    var rotation = new x3dom.fields.Quaternion(0,0,1,0),
        scaleOrient = new x3dom.fields.Quaternion(0,0,1,0);

    tmpMat.getTransform(translation, rotation, scale, scaleOrient);

    // camera image is flipped, therefore flip orientation, too
    rotation.y *= -1;
    rotation.z *= -1;
    translation.y *= -1;
    translation.z *= -1;

    tmpMat = rotation.toMatrix();
    tmpMat.setTranslate(translation);

    return tmpMat;
}
With your detector you should be able to get an array of results, put them to your result matrix and set it as Attribute to your matrixTransform node.
 var markerCount = detector.detectMarkerLite(raster, threshold);

    for (var i=0; i<markerCount; i++) {
        // Get the marker matrix into the result matrix.
        detector.getTransformMatrix(i, resultMat);

        // Copy the marker matrix to the tmp matrix.
        var tmpMat = adaptMarkerMatrix(resultMat);

        // Copy the marker matrix over to your marker root object.
        root.setAttribute("matrix", tmpMat.toGL().toString());
Hopefully your augmented reality application is working fine (if not take a look to the example), feel free to extend and improve it as you want.
 Display example HTML file
 Download full example (.zip archive)